Sunday, May 10, 2009

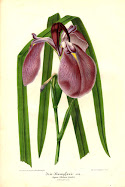
Iris ensata "Confetti Shower"

Early / Mid Season Japanese Iris.


Iris ensata
" Confetti Shower"


Another stunning soft but subtle Japanese iris that grows well in the Otara Birch Gardens making it's own statement when flowering in my garden display.


This iris produces tall stems of huge beautiful flowers in early to mid season. This 6 petal rose violet purple flowers which looks very beautiful in a garden display.


The striking rose - ground, violet, blue stippled petals, purple veins extending into the purple banded halo. Brilliant dark purple style arms complimenting the presentation of this beautiful flower.

The flower smiles and radiates in the soft evening light.


The plant grows really well for me with lots of beautiful clean foliage with stems held proudly above the upright arching foliage. It produces an abundance of flowering stems on a well formed stunning clump in early December.


Another beautiful variety created by Walter A. Payne. This seedling was crossed from selected seedling Payne seedling 30 X Payne seedling 82, being registered and introduced in 1950.


In 1964 this iris was awarded with a Bronze M
edal from the International Horticultural Exhibition, USA.


It grows to a height of 122 cms (48 ins) and flowers mid season in New Zealand, while flowering in the early to mid season else where in the world.


Available in New Zealand and around the world.


Please click on the photo's to enlarge.

Wednesday, May 6, 2009

Windless Wednesday


The Final Curtain.


What a beautiful time of year to wander through my garden and contemplate the passing of time.

To see how the sharpness of Autumn cold....

has highlighted the leaves from green
....

to scarlet and gold....


Soon time to rest....

to conserve....

to gather energy....

as the winter months unfold.


~~~~~~~~~~~~~~
"Come said the wind to
the leaves one day,
Come o're the meadows
and we will play.
Put on your dresses
scarlet and gold,
For summer is gone
and the days grow cold."
- A Children's Song of the 1880's

Saturday, May 2, 2009

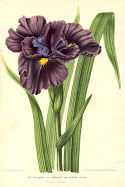
Japanese Iris 'CRYSTAL HALO'


Early / Mid Season Japanese Iris.


Iris ensata
" Crystal Halo"


Growing at Otara Birch gardens a fantastic angel of deep violet petals surrounded with a bight white halo in mid season lasting two to three weeks in its flowering makes it's own statement.

This iris produces tall stems of huge beautiful flowers measuring 5 - 6" across in early to mid season. This 6 petal purple has a white band on the flowers which stands out being very spectacular in a garden display when planted on mass.

The striking purple centres with a bright 1" halo set around the edge of the huge petals, purple veins extending into the white halo. Brilliant dark purple style arms complimenting the presentation of this beautiful huge flower.This flower smiles and radiates in the early evening light from some distance catching the eye with its bold presentation.


The plant grows really well for me with lots of beautiful clean foliage and tall ram rod stems held proudly above the upright arc
hing foliage. It produces an abundance of flowering stems on a well formed stunning clump in early December. Excellent pod parent for use in any hybridizing program.


Another great variety created by W
alter Marx from the many hundreds that he considered to release.


This seedling 49-43 was produced from crossing two Higo seedlings, being registered in 1958 and introduced by him in his 'Walter Marx Gardens' in 1959.

It grows to a height of 97 cms (38 ins) and flowers mid season in New Zealand, while flowering in the mid to late season else where in the world.

Available in New Zealand and around the world.


.


.

Wednesday, April 29, 2009

Windless Wednesday

Autumn in my driveway.


May is a time when the garden starts to drop the final curtain on its performance for the year as the Autumn colours slowly appear through the blanket of green.

The scrunch of dry leaves under foot.
Scrunch... Scrunch... Scrunch.
What a colourful time to be seen.

Tuesday, April 28, 2009

Hybridizing for Seed ~ Part 3 of 3

Hybridizing Japanese Iris for Selected Seed.

How?

Photo 5: In this photo the style is at the top of the style arm with the stigma at centre of the lip. After you have removed the falls and anthers the flower still needs time to mature. This can take from a few hours to the following day for the stigma to mature and open out away from the style in order to be receptive to receiving the pollen.

I plan it so that I remove the petals from the unopened flower the day before I want to do the cross.Then the next morning once the dew ha
s gone I proceed with my transfer of pollen onto the open stigma which the style arms are more flexible for handling. If you leave the transfer to the afternoon on that second day the style arm have become very stiff and erect or turgid and it is very easy to damage the style arm while making the crosses with my big fingers trying to hold the style arms. More care is needed. I find that if I am not careful I snap the style arm and therefore you only have two stigmas left to transfer pollen to. I have been known to damage two stigmas in trying to do my cross by breaking off the style arms and the third transfer pollinated forming seed in only one cavity of the ovary.

Photo 8: In this photo, it shows the pollen and the receptive open stigma. The process of the transfer of pollen is complete. In the centre of the open lip is the open stigma ready to receive any pollen placed on the lip. Try to gently place heaps of pollen on the stigma for the cross to succeed.

You can use a
very soft brush or tooth pick with bruised ends to fray the end, then apply the pollen to this area of the stigma. You can also use your finger as the pollen grains, when dry, will adhere to it or use the open anther and rub it gently downwards over the open lip.

Thoroughly clean any brush used between crosses in a alcohol solution and all
ow to dry completely between any changes in pollen parents.

If there is very heavy rain over night, hold over your pollen from the pollen parent and prepare another pod parent flower ready for the following day.
You can place a small plastic cover bag over the 3 style arms overnight to act as an umbrella only to protect them if rain is forecast. Please remove early in the morning before the sun hits the prepared flower to preve
nt sweating of the flower parts.

Once the transfer of pollen has taken place, your cross is safe after 2 to 3 hours if gentle rain comes in the afternoon. Or if rain is imma
nent then again place a small plastic bag over the flower style arms will allow time for pollination process to occur. Remove bag after rain passes.

If heavy rain follows without cover there is the likelihood of your cross succeeding being reduce severely or could fail. Then plan to do the cross again a few days later if you have sufficient pollen and pod parent flowers to achieve this.

Once the pollen is placed on the stigma, the microscopic pollen tubules grow down inside the style arms from the stigma to the ovules in the ovary for fertilization to occur. Each pollen grain fertilizes one egg in the ovary forming one fertile seed. Many seeds will form in the ovary but not all will be fertilized. In only a few hours, fertilization takes place so any rain after this time is nothing to worry about.

Photo 9: In this photo is the cross on the pod parent plant.

The style arms will wilt over the next few days after the cross has taken place and within the week of pa
ssing, swelling of the ovary will begin to show. The cross must be clearly labeled and tagged with a water proof label.

A number of the cross and a date is all that is needed at the plant. Record the details of pollen parent and pod parent in a note book for further references to be used in later years.

Good luck and do not be afraid to give it go.

Please click on the flower photo's to enlarge.

Acknowledgment. Some information used in the blog was gained from the book "The Japanese Iris" written by the late Currier McEwen. "An international authority on the history and cultivation of the Japanese Iris."
This book is a bible on information for those dedicated to the growing and promotion of the Japanese Iris.

Hybridizing for Seed ~ Part 2 of 3

Hybridizing Japanese Iris for Selected Seed.

How?


Photo 4: Take a set of tweezers to remove the immature anthers from the flower. In a single flower ( 3 falls) the 3 anthers are easy to see and be removed. In multi-petaled flowers ( 6 falls ) there are extra petals which come from the development of stamens and/or style arms, the stigmas may be absent or vestigial and the anthers attached to the petals without any filaments making the cross impossible. So select a variety with strong style arms and stigma so you can achieve your cross.
Look to see the 3 style ar
ms and remove all immature anthers.
See Photo 4.

This photo shows the styles at the tips of the style arms. On the underside of the style is a lip which at the central point of this lip is the Stigma.The closed immature stigma here is held tight against the styles needing time to mature and will open outwards to receive the pollen.


Photo 6: This photo shows the immature undehisced anthers (unopened anther) and the dehisced anthers ( opened to release the pollen) showing the ripe mature pollen grains on the surface of the open anther.


Photo 7:
Is ripe mature anthers containing pollen grains ready
to use and transfer to an open stigma. I collect the opening anthers from flowers of my pollen parents a day or two before hand or on the same day as I remove the falls from the balloon staged unopened flowers of my pod parents which I have selected. Planning in advance and collected more anthers than necessary is required for your selected crosses. But sometimes nature on the day changes your best plans so go with the flow and have some alternative crosses as a back up. I store them on a plastic lid in a dry situation away from direct sunlight to allow the anthers to open and mature ready to use. Try to keep the anthers at room temperature to dry. Avoid getting damp. A tooth pick can be used to remove pollen from the opening anthers as well.

See Part 3 and 3 to follow my hybridizing blog.

Please click on the flower photo's to enlarge.

Acknowledgment. Some information used in the blog was gained from the book "The Japanese Iris" written by the late Currier McEwen. "An international authority on the history and cultivation of the Japanese Iris." This book is a bible on information for those dedicated to the growing and promotion of the Japanese Iris.


Hybridizing for Seed ~ Part 1 of 3


Hybridizing Japanese Iris for Selected Seed.

A hybridizer is someone that deliberately takes pollen from one variety and crosses it with another, thus creating more hybrids.

Why?

To continually select plants with desirable traits to achieve goals through many generations or to obtain specific objectives. By selecting plants for the cross you can control both desirable and undesirable traits. The fun and challenge of this recipe is to determine what characteristics you would like to add to individual seedlings to accomplish a better flower form than what you started with.

So what are the main aims to make a flower even better that what we have now?

With the introduction of new exciting colours. Such as pure blues, pinks, reds and yellows or the introduction of yellow into the falls and standards.

- Better, wider angle branching habits with more flowers per stalk.
- More substance in the petals for durability, texture, substance for hardiness and longlitivity of the flower life.
- More ruffles on the falls.
- More multiple parts to producing 6 petals ( Doubles), 9 and 12 petals (Peony types).
- To extend the flowering periods and encourage reblooming later in the season.
- To introduce shorter growing varieties for smaller gardens. (Miniature or dwarf).
- To introduce better leaf foliage or variegated leaves with more vigor.
- Fragrance is always a must to flowers.
- A better tolerance to grow in alkaline soil conditions.
- A better tolerance to summer heat.

When?

The best time is when the flowers are coming into their flowering season. Pick a flower which is in the balloon stage of being an unopened flower. Meaning the petals are full and just about to unfold.
See photo1.

Once the flowers are fully open your time to seize the moment may have been lost and the insects have already beaten you to the punch and fertilized the flowers while you where catching that extra forty winks. You have to beat the insects before they get there.You need to remove the petals (falls) that attract them to land on the runway and get in first if you would like to achieve the crosses you desire.

How?

Photo 1: Select an unfolding flower before the bees can gain access to the flower. Carefully remove the
falls to expose the internals of the flower. Try not to damage the styles, style arms and immature anthers with in the flower.


To late
in this photo of ones choice as the flower is already open. I have used this photo as an example of an open multi-petaled (6 falls) flower to show you what to do for the removal of the falls.

Photo shows the styles, styles arms and falls.


Photo 2:
Begin careful
ly, the removal of the falls which are the landing pad or runway for insects to be attracted too. On landing they will seek the nectar from the flower base.


Thus resulting i
n pollinating the flower with it's own pollen ( Self pollination) or with pollen from another variety ( Natural cross pollination) as their hairy body brushes past the style containing the stigma.

The stigma is the receptive part which receives the pollen thus transferring any pollen from the insec
ts body.

Photo 3: With the removal of the last fall one can then breathe easy and continue with the next step to be
done.

The style carries the stigma which is supported by the style arms.

The gre
en sheath or spathes, as they are called, give support to the central parts of the flower while protecting the ovary.


See Part 2 and 3 to follow my hybridizing blog.

Please click on the flower photo's to enlarge.

Acknowledgment. Some information used in the blog was gained from the book "The Japanese Iris" written by the late Currier McEwen. "An international authority on the history and cultivation of the Japanese Iris." This book is a bible on information for those dedicated to the growing and promotion of the Japanese Iris.